Project and Interface
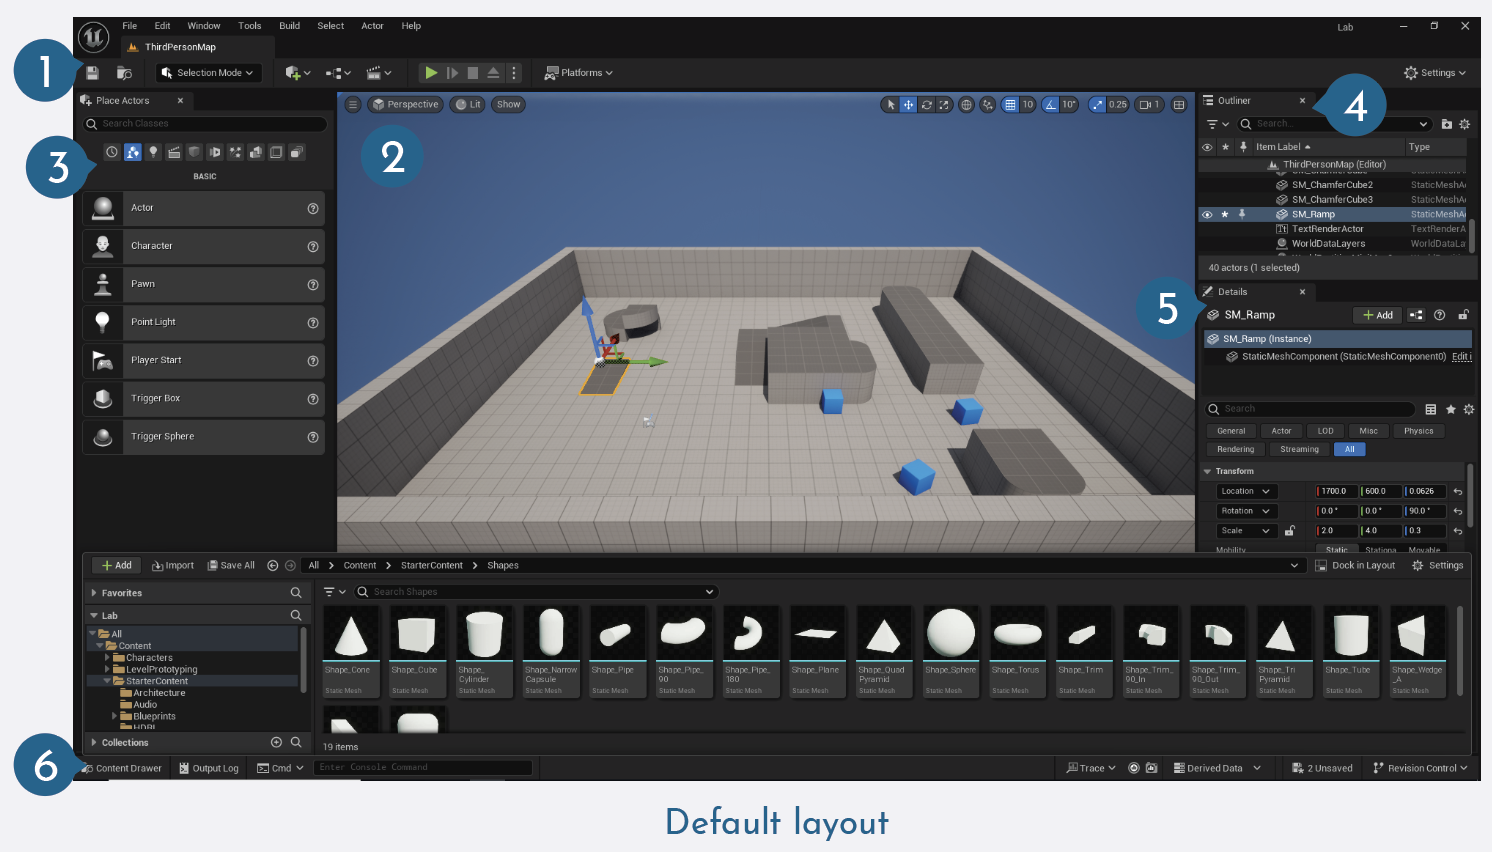
The default layout of Unreal 5 may change between versions however the panel names and features largely remain unchanged. You can reset the layout to default via Window > Load Layout > Default Editor Layout. The Place Actors Panel can be accessed via the Actor Panel button in within the Main toolbar or via Window > Place Actors Panel
Main Toolbar: On this tool bar you will find quick save (Ctrl+S) options, level editing and level sequence options alongside simulation controls for playback. You can also press Alt+P to quick play in editor window and Esc to stop playback. The Place Actors button can also be found here alongside Settings for editor scalability and platform.
Editor Window: This is our scene window where we will creating our environments and viewing our playback. Here you will find translation (W), rotation (E) and scale tools (R). We can also adjust the amount these tools influence selection alongside toggling snapping. There is also the option for multi window layouts alongside light rendering settings.
Place Actors: This window is not always enabled by default (this can be done by enabling Place Actors Panel). Here you will find commonly used tools and additions from lights to volumes and geometry.
Outliner: The outliner is a list of all of the assets currently within our scene / level. Double clicking on any of these will select the object alongside zooming the editor window to that asset, single clicking will select the object. Any asset selected will also change the options available within the details panel. You can also press F on any selected object to zoom to that asset, the details panel will change contextually to which ever asset is selected.
Details panel: We will be spending a lot of time looking at this panel as the properties of the selected object in editor are displayed here for example if we have a light selected the light colour and intensity are shown and adjustable here. Position, Scale and rotation values are also here. Any of the values in this panel can be key-framed and adjusted.
Content Drawer: All of our imported assets be it 3D models, Animations, Images, Sound and custom scripts are found here. This by default will hide and can be pinned open by selecting the Dock in Layout button. It is important to try and keep a clean and managed content drawer to make life easier. To add assets use the import button (you can also drag and drop assets into this folder but best practice is to use import button) Ctrl+Space will toggle this panel on and off.